When most people decide to upgrade their kitchen, one main improvement is installing a range hood. Besides enhancing your kitchen’s appearance, the ductless kitchen hood allows better airflow to remove awful smells and smoke from the house.
While most people consider seeking professional help to install the range hood, any tool savvy handy individual can accomplish the task. Here are simple steps that you can follow.
Prepare for Installation
When building a new kitchen or remodeling, you can install a range hood vent through the wall, but you need to set up sufficient wall surface and electrical supply. On the other hand, if you want to position the ductless range hood under cabinet, you may have to remove some, to create enough ducting space.
To replace an old range hood:
- Loosen the wire nuts and remove the connections to take out the unit
- Turn off power at the circuit breaker for safety purposes
- Disassemble the range hood and work gently to avoid damaging the metals
Take Measurements
Use the mounting bracket to get the measurement from the bottom of the unit to the holder. Also, line up the chase pieces to ensure that they will fit in the ceiling rightly based on the height you want to mount the hood. Assess and mark out your desired elevation spot for the range hood mounting plate.
Go through the availed instruction and make use of the height suggestions to ensure that your units perform effectively. Ensure that you position it at least three inches longer than your cooking surface in all the sides to eliminate fumes effectively.
Further, mark plumb lines where you will locate the hood chase, which determines the outlet’s location. Locate and mark a spot on the wall using a compass to cut out the duct through the ceiling. Keep it as close as possible to the wall since there isn’t much space within the hood chase.
Drill an Opening for The Hood Duct
When replacing an old vented unit, you don’t have to install the ductwork. Nonetheless, for a new ductless range hood installation, you will have to do some extra work. Start drilling the already marked cutout.
Alternatively, you can cut the spot using wallboard saw working against any obstacles. For instance, when you come across any piping, reroute it to leave your opening free. Nonetheless, you may need to consult a professional if you aren’t well familiar with such tasks. Also, ensure that you open up a more comprehensive section so you can work freely.
Complete the Ductwork
Put in place the ductwork and ensure that it leads steadily to the outside your house. Remember that the exhaust must travel out and should not get trapped inside the wall or attic. Erect the chase mount brackets between the right elevation area and the chase layout marks. Place a section of the duct pipe into the opening on the ceiling and the other part onto the range hood’s duct flange.
Proceed to the attic space to finish the exhaust duct installation. Ensure that you vent the range hood through the roof outlet to drive steam out of the kitchen to the attic area. Be cautious to ensure that you don’t leave any space where the vapor can condense into water and accumulate in the vent. For this, you may have to wrap and seal the entire duct connections with heat-resistant tape.
Install the Hood
Drill mounting brackets into your preferred position and anchor them on the appropriate surface. Suppose you wish to mount the system on the wall, drill the screws fully but halfway when using the cabinetry so that the unit can slip and rest over the screws.
For a thinner cabinet, hammer in an extra wooden block to strengthen the screws. Assess the alignment and ensure that the vent matches the duct’s hole and realign the range hood before tightening the screws. You can use a level to confirm whether you have installed the hood appropriately.
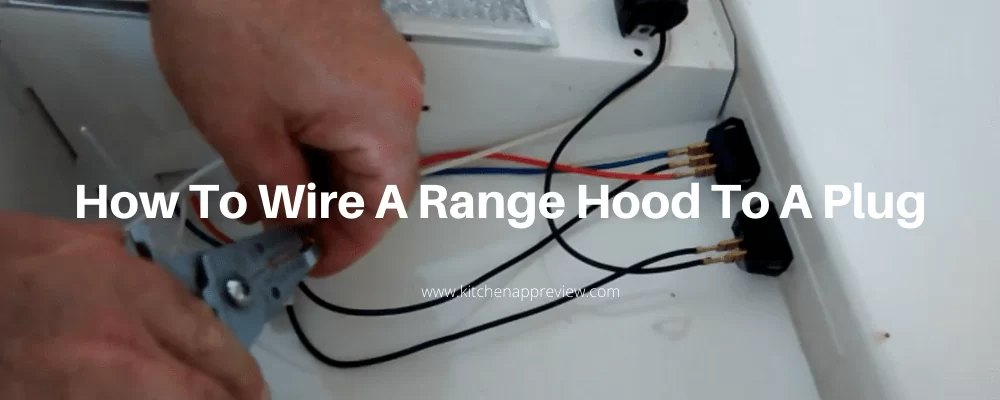
Connect the Wires
Inspect the instruction manual to determine the type of wiring needed. Also, check through the unit, and in most cases, the best ductless range hood will have black and white wires that you need to attach for the efficient operation of the fan and lighting elements. Run the cable through the wall to connect them to those on the hood. If you aren’t good with electrical instructions, you can seek experts’ help.
Still, if you wish to proceed by yourself, join the black wires in the hood to the black ones inside the wall and do the same for the white cables. Next, connect the green ground wire in the wall to the hood’s green ground screw. At this point, you can install an electric plug if you don’t have one and plug it into the range hood.
Position the Hood Chase Appropriately
Pull out the hood chase’s protective wrap from the point they lap over. It would be best if you leave the wrap long enough to protect the finish during installation. Next, place the hood chase over the ductwork and attach it to the brackets. Pull out the protective wrap from the range hood.
Install the Filters
Attach the filters onto the range hood following all the available instructions on the package and fasten the grease guards. Now place the hood cover and secure all the screws.
Test your Unit's Workability
Reset the circuit breaker to the on position and check whether the fans and lightings work as expected. Also, for a vented range hood, check the duct and ensure proper ventilation. Confirm that the wholly installed hood creates sufficient open spaces over the cooking area.
Conclusion
The above guide outlines essential steps to follow when wiring a range hood to a plug. The time taken to finish the installation process depends on your level of expertise. Still, handle all the wiring tasks with care to avoid future hazards.
You can also seek assistance from a professional electrician if you find it challenging. Besides, refer to the manufacturer’s installation instructions to ensure that you meet all the connection conditions.